Karins Kottage

Entertaining * Decorating * Fashion * Travel

  • Contact Us
    • Let’s Collaborate
  • Decorating
    • Tour
      • Coastal Guest Room
      • Dining Room
      • Family Room
      • Front Porch Ideas
      • Kitchen Nook
      • Mud Room Built Ins
      • Shop My Home
    • Crafting
    • DIY
    • Furniture redo
    • Chalk Painting/Painting
    • Organizing
    • Shop My Home
    • Sewing
    • Wall treatments
    • Window treatments
  • Entertaining
    • Baby Showers
    • Birthday Parties
    • Bridal Showers
    • Graduation parties
    • Holidays
      • Christmas
      • Easter
      • 4th of July
      • Halloween
      • Parties
        • Super Bowl Party
        • weddings
      • Thanksgiving
      • Valentines
    • Outdoor Entertaining
    • Tablescapes
  • Fashion
  • Recipes
    • Breads
    • Desserts
    • Main dishes
    • Pasta
    • Recipes
    • Salads
    • Side Dishes
    • Soups
  • Travel
    • Cancun in March
    • Traveling through Italy
    • My Travels to Hong Kong
    • Italy
    • Rogers Gardens- Newport Beach California
Home » How to make wooden bead garland with tassels

in Crafting· Decorating· Holidays· Valentines

How to make wooden bead garland with tassels

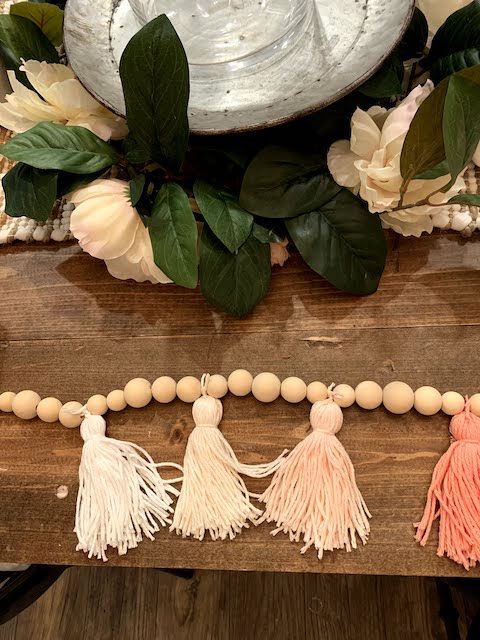
I am so excited to show you how to make wooden bead garland with tassels. My daughter made this and it turned out amazing! This tutorial is super easy and inexpensive to make!

How to make wooden bead garland with tassels

You know how much I love to do easy crafts and this one fits the bill. Plus this craft can be used as Valentine decor as well as decor you can use all year long.

My daughter made this to match her beautiful glass vases that she painted to look like pastel ceramic vases.

Supplies needed to make wooden bead tassel garland

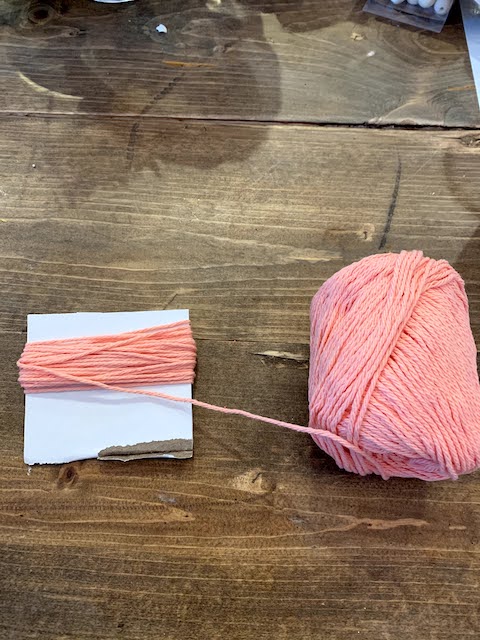
Sugar and Cream Yarn (link below in Shop)- color – Chamomile, Tea Rose, Soft Ecru, White

Wooden Beads- small and medium sizes or whatever size you would like your bead garland to be. Just make sure to use two different sized beads.

How to make the tassels

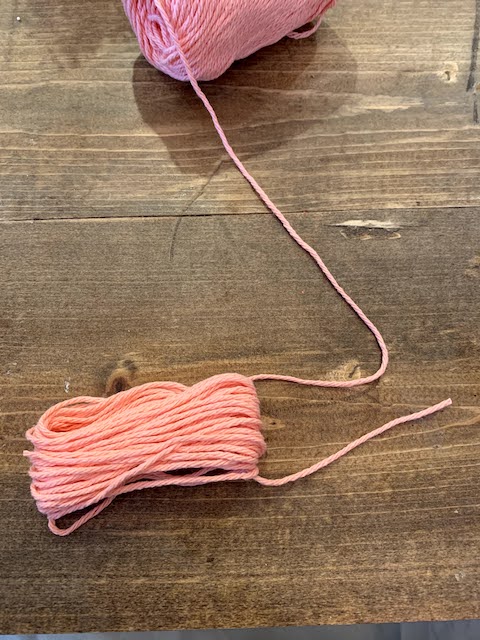
Begin making the tassels by using a 4″ square piece of cardboard. Emily just used a random piece of cardboard she had laying around.

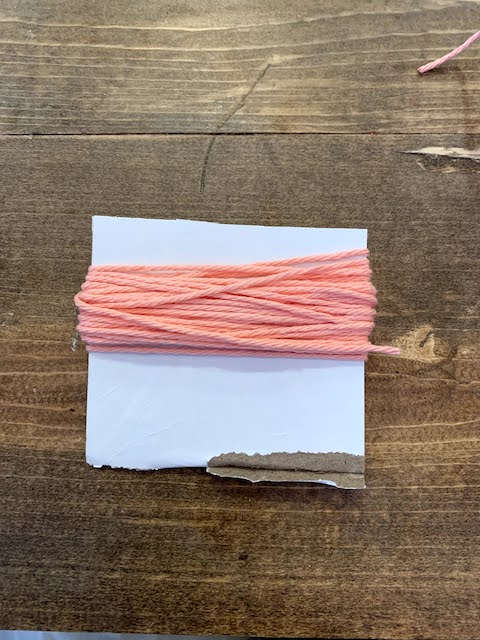
Wrap the yarn around the cardboard 40 times for each tassel.

How to make tassels using a piece of cardboard

The yarn should look like this once the strings of yarn are wrapped around 40 times.

This craft reminds me of my fluffy white anthropologie knock off wreath that I made where I made lots of fluffy puffs.

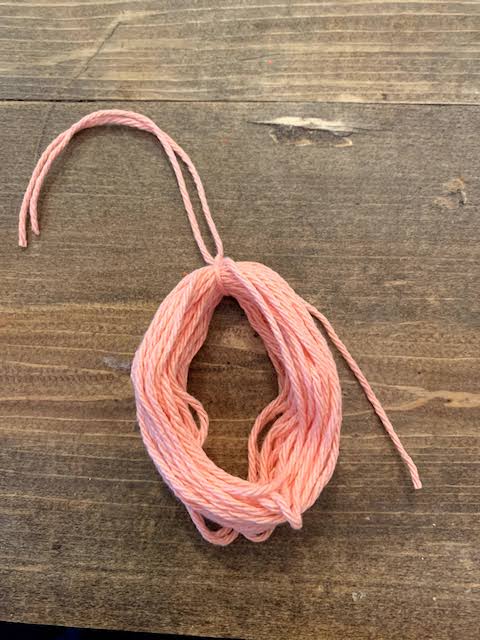
Carefully slide the entire wrapped yarn bundle off of the cardboard.

wrap yarn 40 times around cardboard  to make tassel.

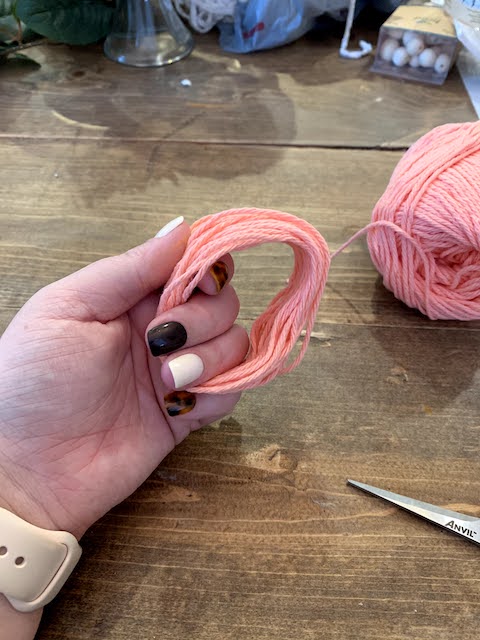
Take a piece of yarn from off the skien of yarn and feed through the middle of the bundle.

How to make a yarn tassel

Tie the yarn into a tight knot. Leave plenty of length so you can tie it onto the wooden bead garland.

tie in a knot

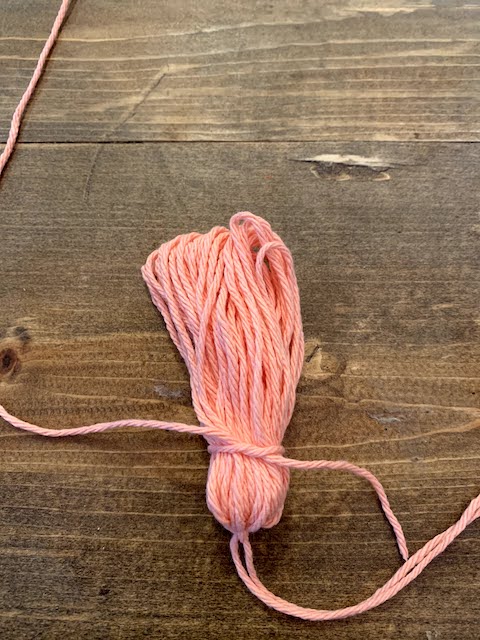
Cut another small piece of yarn and wrap it around the bundle about 1 inch down from first knot.

Secure with a tight knot.

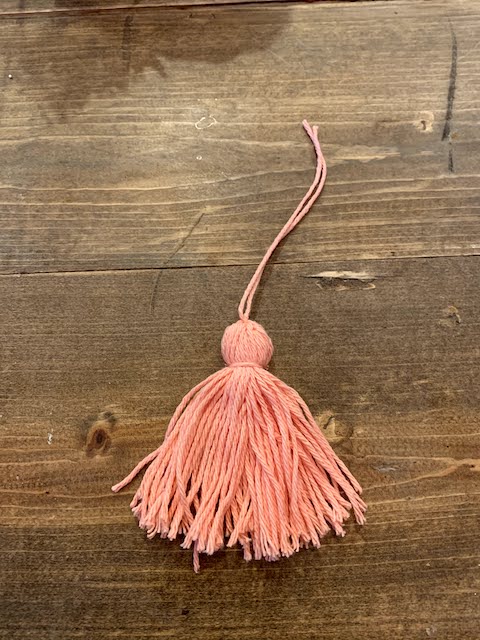
Slip scissors through all the loops and cut each loop to finish the tassel.

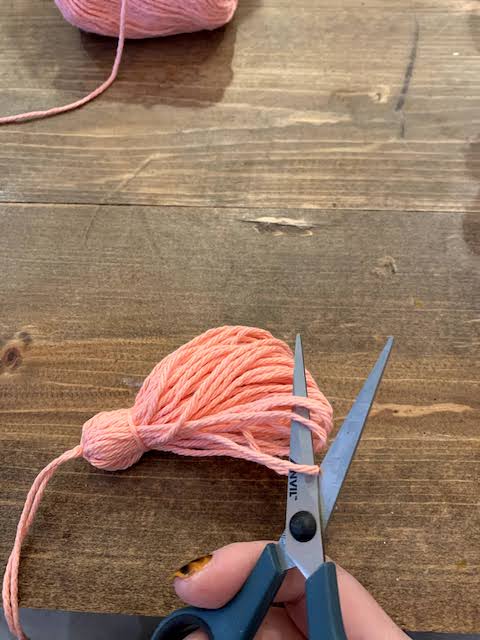
Fluff out the yarn strings. Your tassel is complete!

Finished yarn tassel

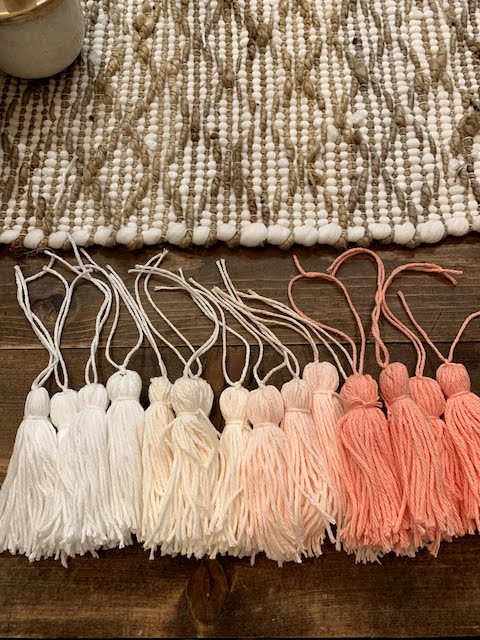
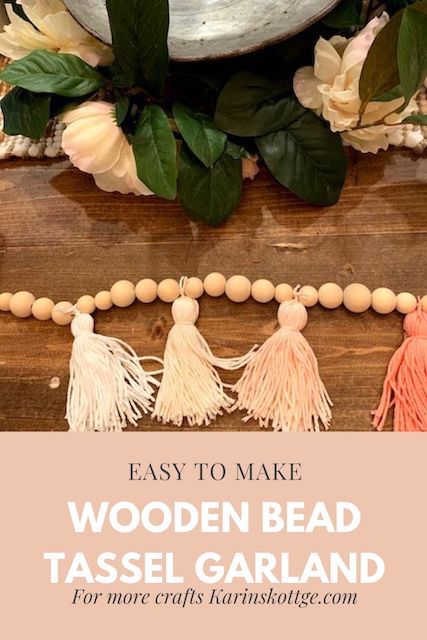
For this garland Emily made 25 tassels in colors that created an ombre look going from light to dark.

I love the colors she chose. These colors remind me of my heart shaped patchwork Valentine sugar cookies I made.

25 ombre tassels

Wooden Bead garland tutorial

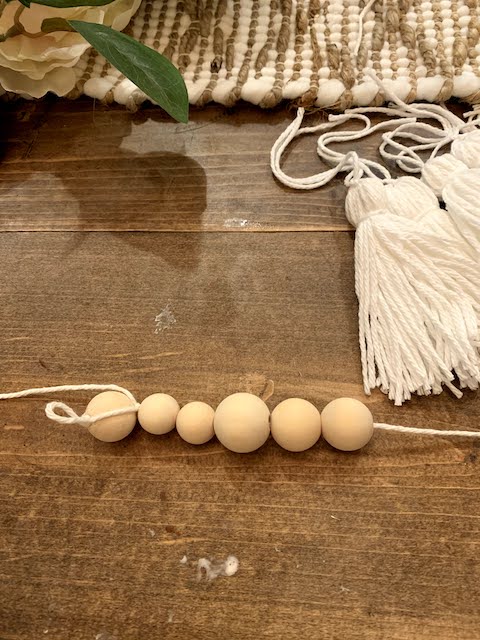
To start decide how long you want your garland to be.

Cut some yarn and make a slip knot, thread through the bead once and then one more time so that the long piece of string is available to string on more beads.

Then add two small beads and then another large bead, continue this pattern for the length of the yarn.

How to make wooden bead garland

Once you get to the end, feed the yarn through the bead once and then again.

Make another slip knot to hold it all together. The little slip knots allow you to hang the garland.

attach yarn tassels to wooden bead garland

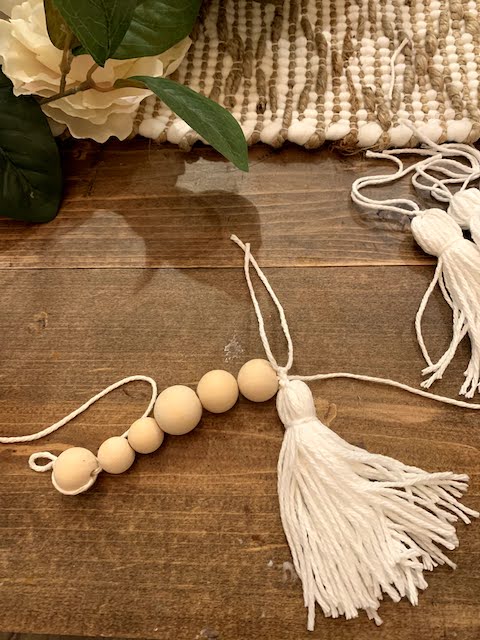
Once you have all the beads threaded on, it is time to add the tassels.

Tie tassels on between every 5 beads.

wooden bead garlands with yarn tassels

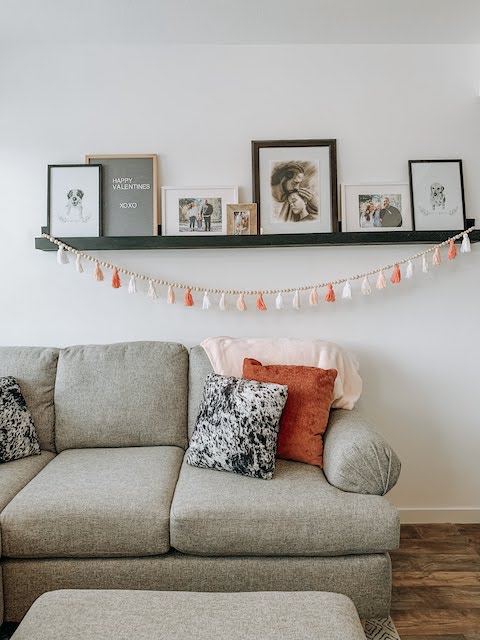
Display your wooden bead tassel garland in a fun area of your home. Emily hung hers off her wooden shelf. It looks so cute!

You could make these in any color to match your home decor or create one for a special holiday.

Here are few other crafts you might like

These paper masks are great for birthday parties and are easy to make

Make these hot air balloons for your next boy or girl baby shower

DIY Flower Letter Tutorial in pink white and peach

Heart shaped cookies here 

Valentine french white chocolate dipped pretzel rods

Heart shaped cake with chocolate lid

How to make Wooden bead garland with tassels

Click to Shop this Post

Pin This For Later

Wooden bead tassel garland- KarinsKottage.com

5 Comments

Stay connected to the Kottage

don't miss a thing
☞  SIGN UP TO receive THE LATEST news and updates from Karins Kottage ☜
You’ve successfully signed up! Check your email for details.
Previous Post: « Centerpiece Wednesday Linky Party Time!
Next Post: How to make Valentine dipped pretzel rods »

Reader Interactions

Trackbacks

  1. One sweet peach birthday party - Karins Kottage says:
    April 27, 2022 at 12:41 pm

    […] Emily made them the same way she made this wooden bead and tassel garland. […]

    Reply
  2. Easy Valentine Love Bugs to Make - Karins Kottage says:
    February 7, 2022 at 4:11 pm

    […] Valentine wood bead and tassel garland tutorial […]

    Reply
  3. How to upcycle glass vase to ceramic - Karins Kottage says:
    January 18, 2021 at 9:42 pm

    […] Valentine wood bead and tassel garland tutorial […]

    Reply
  4. Valentine Heart Shaped Burlap Wreath - Karins Kottage says:
    January 18, 2021 at 9:38 pm

    […] Valentine wood bead and tassel garland tutorial […]

    Reply
  5. How to make Valentine dipped pretzel rods - Karins Kottage says:
    January 18, 2021 at 9:28 pm

    […] Valentine wood bead and tassel garland […]

    Reply

Leave a Reply Cancel reply

Your email address will not be published. Required fields are marked *

Recipe Rating


This site uses Akismet to reduce spam. Learn how your comment data is processed.

Primary Sidebar

Search This Blog

Welcome to Karin’s Kottage!

Summer porch

Hi I am Karin! Welcome to my Kottage. I share all things about life here at the Kottage. Cooking, DIY, Crafts and Travel! Learn more about me and my Kottage by clicking on the photo.

Shop My House

Shop My House
  • Contact Us
  • Decorating
  • Entertaining
  • Fashion
  • Recipes
  • Travel

Footer

Looking For Something

Let’s Get Social

  • Email
  • Facebook
  • Instagram
  • Pinterest
  • RSS
  • Twitter
  • YouTube

RSS RSS feed

  • Outdoor DIY Decor Ideas + Coastal Crafts You’ll Love
  • Easy Roasted Vegetable Sandwiches on Ciabatta – A Crowd-Pleasing Favorite!
  • Patriotic Red White Blue Decor + Stylish IKEA Hack
  • Easy & Charming Red, White & Blue Tablescape

Copyright © 2025 · Market theme by Restored 316