Karins Kottage

Entertaining * Decorating * Fashion * Travel

  • Contact Us
    • Let’s Collaborate
  • Decorating
    • Tour
      • Coastal Guest Room
      • Dining Room
      • Family Room
      • Front Porch Ideas
      • Kitchen Nook
      • Mud Room Built Ins
      • Shop My Home
    • Crafting
    • DIY
    • Furniture redo
    • Chalk Painting/Painting
    • Organizing
    • Shop My Home
    • Sewing
    • Wall treatments
    • Window treatments
  • Entertaining
    • Baby Showers
    • Birthday Parties
    • Bridal Showers
    • Graduation parties
    • Holidays
      • Christmas
      • Easter
      • 4th of July
      • Halloween
      • Parties
        • Super Bowl Party
        • weddings
      • Thanksgiving
      • Valentines
    • Outdoor Entertaining
    • Tablescapes
  • Fashion
  • Recipes
    • Breads
    • Desserts
    • Main dishes
    • Pasta
    • Recipes
    • Salads
    • Side Dishes
    • Soups
  • Travel
    • Cancun in March
    • Traveling through Italy
    • My Travels to Hong Kong
    • Italy
    • Rogers Gardens- Newport Beach California
Home » Easy Cornice Tutorial Using Foam Board

in Decorating· Sewing· Window treatments

Easy Cornice Tutorial Using Foam Board

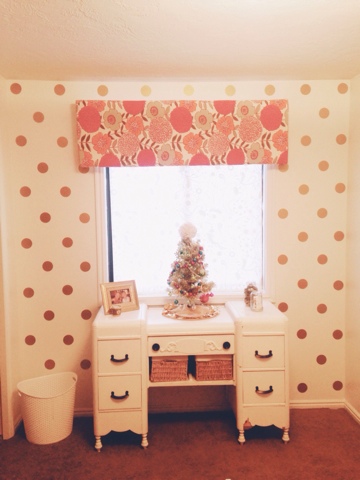
Easy cornice made from foam board

This is such an easy way to make a cornice by following my cornice tutorial using foam board! It is very lightweight and no sewing is involved. (Our fabric ran a little short so we had to sew two edges on ours) But if you cut your fabric correctly you should not have a problem at all.

You can see the entire room reveal here

Materials:

– Foam insulation board from your local hardware store 3/4″ thick to 1″ thick
– duct tape (we used silver to match the back of the foam insulation)
– a curtain rod
– hot glue
– straight pins
– fabric
– quilting batting

Directions:

Measure your window with a 3-4 inch overhang on each side.

Then determine the height from top of cornice to bottom as you desire.

The cornices in the kids rooms were about 2 feet in height and the cornice in the basement room reveal was only 1 foot in height.

If you have a blind in the window you probably want to make your foam cornice a little larger to cover all the hardware.

Tip- the higher you hang the cornice the larger the room feels.

Foam board cornice tutorial

How to cut the foam board for your valance

Use your measurements to cut the foam insulation to your measurements.

We used a box cutter with short sawing motions.

And get ready for lots of little foam beads.

Now cut the side pieces. These should be the depth of your curtain rod. Not any deeper or it won’t be able to hang on the curtain rod brackets.

The best way to get the right measurement is to place the main piece of foam board you just cut on a flat surface.  Place your curtain rod on top with the brackets facing up.

Grab a piece of the foam board and place perpendicular on the short side.

Make a mark just below the edge of the curtain rod edge.

Cut off the excess.

Easy cornice tutorial using foam board

Duct taping your foam board cornice

Grab your duct tape and (with help) tape the short side pieces to the long board both inside and on the outer edge for stability.

Repeat on the other side.

You now have the base of your cornice.

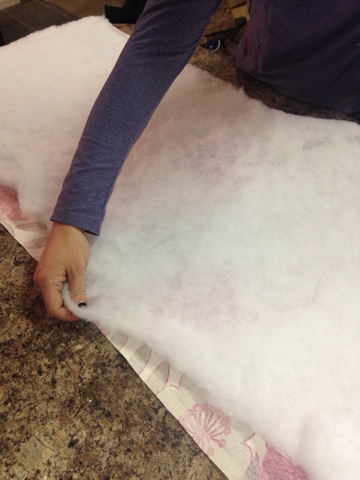
Adding the batting to the foam board

Now it time to cut the batting. Place foam board down so that the short ends are holding it up.

Lay batting down and cut to size leaving about 2 inch overhang of the batting to allow the edges of the cornice to be padded as well.

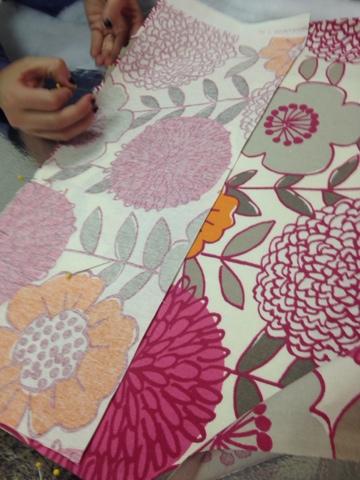
Once that is the correct size proceed to cut your fabric to size. Make sure you will have extra to pull over all the edges.

Batting for foam board cornice

Fabric for the foam board cornice

Lay the fabric on your work surface, pretty side down, then layer the batting and then the foam board.

Our fabric wasn’t long enough so we had to sew extra pieces of fabric to each side to make it long enough.

The seams hit the edges perfectly.

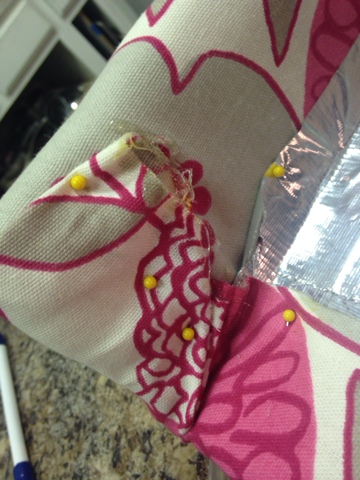
Grab your duct tape again and start on the short sides.

Pull fabric over and tape all edges down.

Go to the other 3 sides and repeat.

Duct tape making foam board cornice

To add stability we used straight pins every so often.

For the corners we folded them in and pinned them as well.

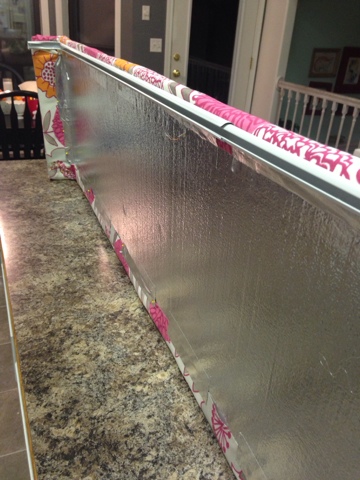
Attaching the curtain rod

Hot glue all along top edge to attach the curtain rod.

It holds it perfectly because it is so light weight.

You can see the curtain rod is attached and it is ready to be hung!
Foam board cornice tutorial

Ta Da you are done!

Hanging the foam board cornice

Now all you have to do is hang it. The curtain rods come with simple hardware and it works great!

We are not perfectionists, we use our hands, fingers, and or arm lengths to measure things if no tape measure is handy.

In fact when we hung the one in my basement I said “my side measures 4 fingers from the edge of the window” Madeline said “mine measures 4 loosely” ok good enough!” Haha

Easy cornice tutorial using foam board

Here is the Orange one we made for the boys room.

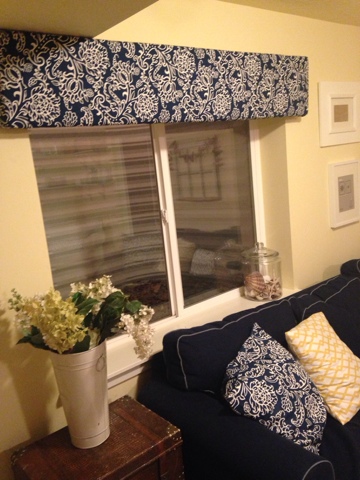
Here is the one in my basement.

This is one is shorter because the ceiling is lower.

Basement window treatment

More window treatment posts you will enjoy

Faux roman shade using no hardware

Easy roman shade using an old Ikea shade

Budget Land of Nod girls bedroom

Bamboo shades that I love

Shop

16 Comments

Stay connected to the Kottage

don't miss a thing
☞  SIGN UP TO receive THE LATEST news and updates from Karins Kottage ☜
You’ve successfully signed up! Check your email for details.
Previous Post: « Budget Land of Nod Inspired Girls Room
Next Post: Visions of sugar plums Christmas tablescape »

Reader Interactions

Comments

  1. J D says

    February 4, 2024 at 5:57 pm

    Thank you so much for this great tutorial. This exactly what I will do now that I’ve been less than satisfied with my efforts so far to make a valance for a super wide slider that is never used and invested too much in fabric. Thanks again.

    Reply
  2. Sue says

    January 21, 2022 at 12:31 pm

    Hi Karin
    How long did you allow the glue to dry before hanging yours?
    Thanks Sue

    Reply
    • Karins Kottage says

      January 21, 2022 at 1:13 pm

      Hi Sue,
      Hot glue dries very fast so I think we only waited like 5 minutes. The cornice is very light weight too so it should not be an issue. Let me know how it goes for you. 🙂

      Karin

      Reply
  3. Anita Holland says

    February 4, 2020 at 8:23 am

    Looks great well done!

    Reply
    • admin says

      February 4, 2020 at 3:56 pm

      Hi Anita, Thank you for stopping by! We loved how it turned out too! It is so fun to work on decorating projects with my daughters.
      Karin

      Reply
  4. Dee | Grammy's Grid says

    February 4, 2020 at 4:02 am

    Looks great! Pinned.

    Reply
    • admin says

      February 4, 2020 at 4:21 am

      Dee! Thank you! It really looks adorable! Thanks for stopping by!
      Karin

      Reply
  5. Anonymous says

    March 7, 2017 at 10:26 pm

    This method is fantastic because I can use the existing brackets and rod and just glue the rod to the cornice! Another idea I have is to glue the rod to the cornice at the center of the cornice to raise the height of the cornice. Can't wait to try it out!! Thank you so much!

    Reply
  6. Anonymous says

    October 15, 2016 at 12:33 pm

    How did you hang the board if its made of Foam?

    Reply
    • admin says

      October 15, 2016 at 1:59 pm

      It has the curtain rod attached to the foam board… so you attach the brackets that come with the curtain rod to wall and hand the rod on the brackets.. just like you would if the foam board was not attached to the rod. The foam board is very light weight so it hangs nice.

      Reply
    • admin says

      October 15, 2016 at 2:01 pm

      hang not hand

      Reply
  7. Anonymous says

    December 3, 2014 at 12:09 am

    I love how you made this. It turned out great!
    ~Bonnie @ Our Secondhand House

    Reply
    • admin says

      December 7, 2014 at 3:39 pm

      Thank you Bonnie for stopping by and saying Hi! We had fun pulling this together!
      Karin

      Reply

Trackbacks

  1. Faux Roman Shade Tutorial Using No Hardware!! - Karins Kottage says:
    April 27, 2022 at 1:11 pm

    […] Valances Out Of Foam Board […]

    Reply
  2. Sea Shell Mirror Tutorial - Karins Kottage says:
    December 26, 2020 at 11:05 pm

    […] Easy Cornice Tutorial using foam board […]

    Reply
  3. Budget Land of Nod Inspired Girls Room - Karins Kottage says:
    October 19, 2020 at 3:00 pm

    […] Here is the link to this awesome EASY CHEAP cornice tutorial!! […]

    Reply

Leave a Reply Cancel reply

Your email address will not be published. Required fields are marked *

Recipe Rating


This site uses Akismet to reduce spam. Learn how your comment data is processed.

Primary Sidebar

Search This Blog

Welcome to Karin’s Kottage!

Summer porch

Hi I am Karin! Welcome to my Kottage. I share all things about life here at the Kottage. Cooking, DIY, Crafts and Travel! Learn more about me and my Kottage by clicking on the photo.

Shop My House

Shop My House
  • Contact Us
  • Decorating
  • Entertaining
  • Fashion
  • Recipes
  • Travel

Footer

Looking For Something

Let’s Get Social

  • Email
  • Facebook
  • Instagram
  • Pinterest
  • RSS
  • Twitter
  • YouTube

RSS RSS feed

  • Does This Dress Look Like a Nightgown? Styling a Blue and White Striped Shirt Dress 5 Ways!
  • How to Make a Beautiful Spring Cake with Buttercream Flowers
  • Creative DIY Gifts, Delicious Recipes – Weekly Linky Party Highlights
  • Wicked 4 You: A Pink and Green Wicked 4th Birthday Party
This under $30 striped shirt dress had me wonderin This under $30 striped shirt dress had me wondering if I was headed out or off to bed—as it looks like a night gown at first but with a little styling magic, it’s now one of my most versatile summer pieces!

Shop the look:
	•	Blue & white striped shirt dress
	•	Long necklace
	•	White New Balance sneakers
	•	Straw tote bag
	•	Denim jacket

Great for travel, market days, or even as a beach cover-up!

#ltktravelstyle #ltkover50 #LTKsummerstyle #karinskottage #summerdress #spring dress 

Comment SHOP below to receive a DM with the link to this post on my LTK ⬇ https://liketk.it/5d9fL #ltkmidsize #ltkfindsunder50 #ltktravel
Travel for 15 days with only carryon luggage. My t Travel for 15 days with only carryon luggage. My two tone backpack is from Italy a few years ago but I found one similar in my LTK shop for you. 

My travel outfit tip- wear your denim jacket and raincoat to leave room in luggage. Loving this lightweight raincoat that is lined. It also fits great in my backpack.

White sneakers with leopard detail and super comfy and go with everything! 

@coldwater scarf in a beautiful watercolor print is perfect to dress up or down an outfit. 

#midsizeover50 #classicfashion 
#styleatanyage #raincoat #traveltipsandtricks #fashionover50 #travelfashion 

Comment SHOP below to receive a DM with the link to this post on my LTK ⬇ https://liketk.it/5cXXt #ltkmidsize #ltkover40 #ltktravel
Better late than never, friends! This week’s Lin Better late than never, friends! This week’s Linky Party is full of Spring DIY and Decor Ideas you’ll love! 💐

🌿 A porch makeover you can actually do
📚 The cutest vintage book page envelopes
🎨 French flower pots made easy
🍫 Chocolate chip sourdough waffles (yes, please!)

@loulougirls @sonatahomedesign @freshvintagebylisas @anorganizedseason 

PLUS I’m sharing a new spring tablescape using branches from my yard 🌿 and how I recreated a Cindy Hattersley outfit by shopping my own closet 👗

Tap the link in bio to explore it all and don’t forget to share your latest creations too!

#springdecor #diydecorideas #linkypary #karinskottage #springtablescape #fashionover50 #springcrafts
Adirondack chairs with cup holders and foot stools Adirondack chairs with cup holders and foot stools from Amazon! Add a couple of cute pillows and the backyard is ready.

Perfect for summer evenings! Made for all weather and come in lots of different colors too!

Wooden base with Hammock is a must for your backyard. It is my happy place 😁

#summerliving #adirondackchairs 
#patiofurniture #backyardliving #lazysummernights 

Comment CHAIRS below to receive a DM with the link to shop this post on my LTK 

⬇ https://liketk.it/5cpw7 #ltkseasonal #ltkhomestyle
Thank you @goodhousekeeping for sharing my No-bake Thank you @goodhousekeeping for sharing my No-bake Diploma cookie idea for graduation parties. They really look like mini diplomas and are such a fun way to have a special treat without having to bake! 

https://www.goodhousekeeping.com/life/g5159/graduation-party-ideas/

#graduationtreats #graduationcookie #nobakegraduationcookies #diploma #diplomacookies
Black & White, but Make It Spring! Keeping it chic Black & White, but Make It Spring!
Keeping it chic and easy with some favorite Amazon finds perfect for sunshine days ahead:
	•	A striped button-down maxi dress you’ll live in—wear it out or toss it over a swimsuit
	•	White New Balance sneakers with a dash of animal print
	•	Classic black sandals (because they go with everything!)
	•	Striped tee + white linen flowy pants = effortless spring uniform
	•	Straw hat + sunnies for that vacay vibe
	•	And a little sparkle: silver bangles, pendant necklace & earrings to top it off

Which one are you adding to your cart first?
#AmazonFinds #SpringStyle #AmazonFashionFinds #BlackAndWhiteStyle #KarinsKottageStyle #Over50Fashion #SpringOutfitInspo

Comment SHOP below to receive a DM with the link to shop this post on my LTK ⬇ https://liketk.it/5bVYQ #ltkstyletip #ltkmidsize
This week’s Spring Style Crafts and Bakes Linky This week’s Spring Style Crafts and Bakes Linky Party—your weekly dose of spring ideas and inspiration to spark creativity, refresh your space, and celebrate the season of renewal! Fashion tips on how to change your bossy shape vidually , A gardening journey, how to make a succulent birdhouse and a fabulous raspberry pistachio cake recipe! 

Today on the blog I’m highlighting these 4 bloggers 

@thriftingwonderland @_esmesalon @styleyourselfconfident @stephcreatesdiyhomeandcrafts 

https://karinskottage.com/2025/04/spring-style-crafts-and-bakes-linky-party.html
Another fun take on one of my favorite over 50 fas Another fun take on one of my favorite over 50 fashion bloggers @cindyhattersley 

I saw her outfit and shopped my closet to put together a similar look. I added a pop of red with my red flats. 

Tommy Hilfiger blue dress with denim jacket perfect spring look! 
#bluedress #jeanjacket #denimjacketwithdress 

Comment SHOP below to receive a DM with the link to shop this post on my LTK ⬇ https://liketk.it/5bomb #ltkover40 #ltkmidsize #ltkstyletip
Welcome to this week’s Karins Kottage Linky Part Welcome to this week’s Karins Kottage Linky Party where we’re celebrating Easter treats and crafts linky party you’ll absolutely love. From colorful spring desserts to cute DIY baskets, I’ve rounded up four amazing bloggers who are making this season sweeter than ever. 

@cincyshopper @lois_walkingonsunshinerecipes @annsentitledlifeblog @hunnyimhomediy 

#eastertreats #pasteleasterdecor #dollarstoreeasterdiy #easterdesserts
AD: Coldwater Creek Outfit Check – 20% Off Right AD: Coldwater Creek Outfit Check – 20% Off Right Now!

Loving this spring-to-summer look from Coldwater Creek! The Artful Daisey Ankle Jeans are comfy and flattering with the perfect midweight stretch. Paired with the Love the Fit Tee in garden green—such a fresh pop of color!

My Minnetonka Georgine Sandals are summer must-haves (so comfy!), and the Ziggy II Crossbody Bag is cute and holds all the essentials. Topped it all off with the vibrant Bountiful Borders Scarf—so versatile and fun!

Shop the full look on my LTK while everything is 20% off!

#ColdwaterCreekStyle #Coldwatercreek

Comment SHOP below to receive a DM with the link to shop this post on my LTK ⬇ https://liketk.it/5aQ6t #ltkmidsize #ltkstyletip #ltkover40
Follow on Instagram

Copyright © 2025 · Market theme by Restored 316