Karins Kottage

Entertaining * Decorating * Fashion * Travel

  • Contact Us
    • Let’s Collaborate
  • Decorating
    • Tour
      • Coastal Guest Room
      • Dining Room
      • Family Room
      • Front Porch Ideas
      • Kitchen Nook
      • Mud Room Built Ins
      • Shop My Home
    • Crafting
    • DIY
    • Furniture redo
    • Chalk Painting/Painting
    • Organizing
    • Shop My Home
    • Sewing
    • Wall treatments
    • Window treatments
  • Entertaining
    • Baby Showers
    • Birthday Parties
    • Bridal Showers
    • Graduation parties
    • Holidays
      • Christmas
      • Easter
      • 4th of July
      • Halloween
      • Parties
        • Super Bowl Party
        • weddings
      • Thanksgiving
      • Valentines
    • Outdoor Entertaining
    • Tablescapes
  • Fashion
  • Recipes
    • Breads
    • Desserts
    • Main dishes
    • Pasta
    • Recipes
    • Salads
    • Side Dishes
    • Soups
  • Travel
    • Cancun in March
    • Traveling through Italy
    • My Travels to Hong Kong
    • Italy
    • Rogers Gardens- Newport Beach California
Home » Hot Air Balloon decoration Tutorial

in Baby Shower· Birthday Parties· Crafting· Entertaining and Parties

Hot Air Balloon decoration Tutorial

Hot air balloon decoration tutorial! Made by my friend Valerie Pickard

Items Needed

Items needed –

paper lanterns I believe these were 12″ lanterns

12″ square Scrapbook paper

black edging ink

Elmer’s glue

hot glue gun

bakers string
chip wood boxes
hole punch
paint

Directions

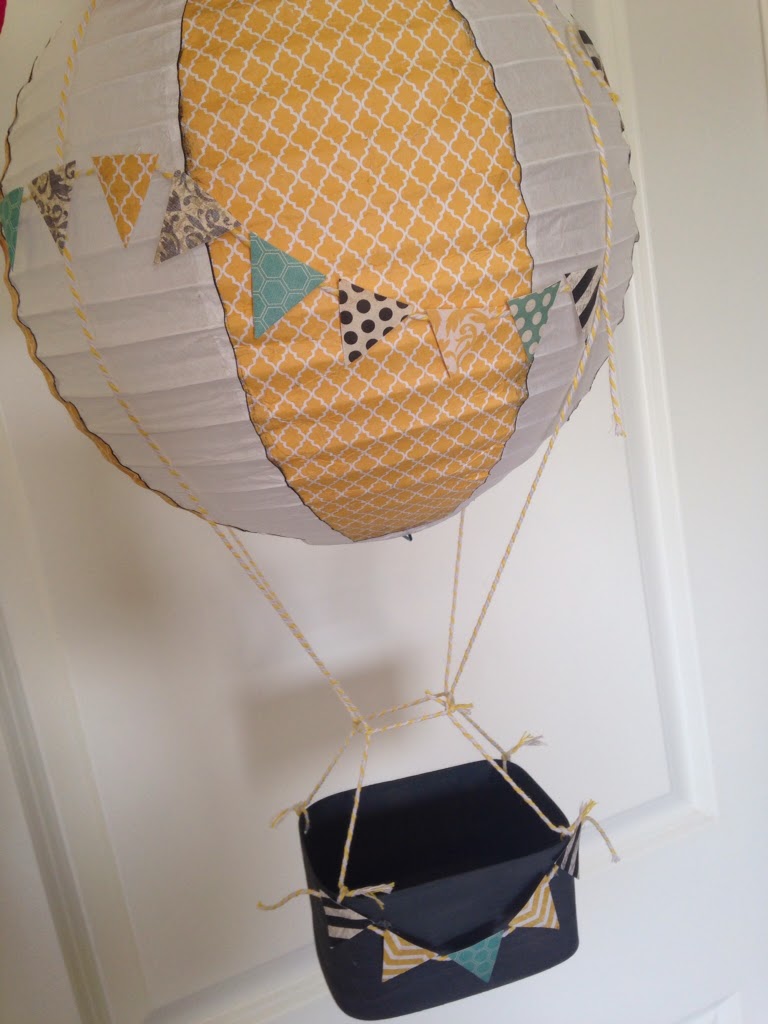
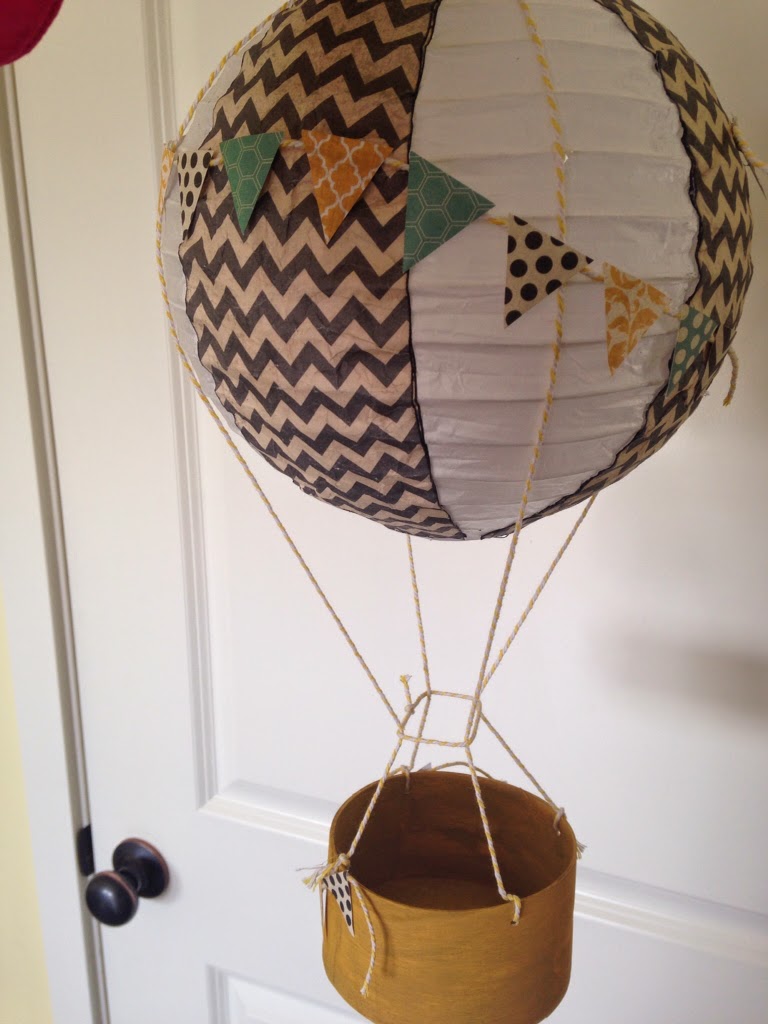
Step 1- Cut out 4 pieces of scrapbook paper to fit the shape of lantern…smaller at top and bottom..as wide as you would like (she did not give the dimensions)
Step 2- Really crinkle the paper to make it soft and pliable..get kids to help! Ink the edges if desired to make them stand out.
Step 3- Use Elmer’s glue to attach all 4 pieces to the lantern…evenly spaced.
Step 4- String- take two long pieces of bakers twine or other sturdy string, place together and fold them in half. Hold in the middle (where it’s folded) in one hand, take the end of the string and put under the metal bar on top of the balloon and loop it through the middle of the string and pull the ends so it is like a little slip knot. Then divide the string and put one string down each white panel of lantern.
Hot glue each string to the metal circle edge covered in white paper around the top of lantern. Pull strings straight down and add another dab of glue about 3/4 the way down to hold each string in place.
Step 5- After you tie these strings onto your “basket” (directions below) Add another small piece of string around all four to pull them in a bit so as to make it look more authentic.
–
Step 6- Paint your chip wood baskets in your desired color let dry
Step 7- Punch 4 small holes into the basket using a small hole punch.
Step 8- Tie the ends of string to the basket and add the small circle of string around all four.
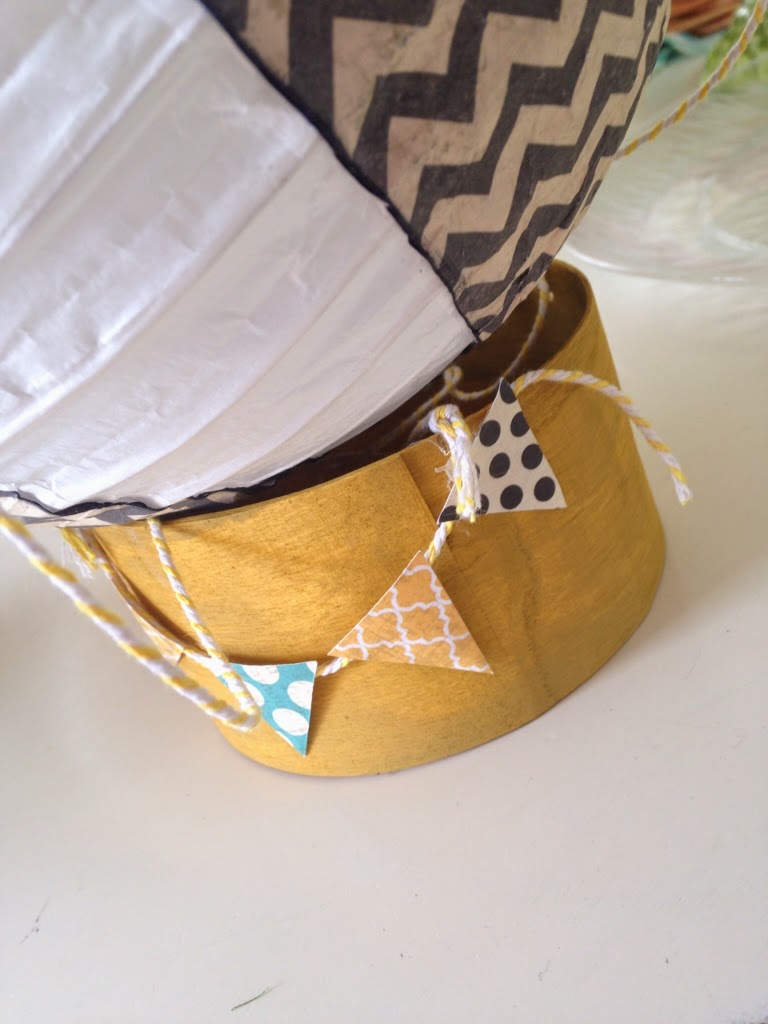
Step 9- Cut mini triangles out of scrapbook paper..approx 1″ – 1 1/2″ Make mini triangle banners by glueing the triangles to pieces of twine. Attach one to the basket and one long one around the the lantern.
Soooo adorable!! Valerie made 20 of these to hang above our cupcake dessert tables.
We hung them up using multiple strands of fishing line…it really looked amazing!

Shop this post

paper lanterns

chipwood boxes

 Linking to
DIY Dreamer CedarHillFarmHouse Savvysouthernstyle 
Frugal Friday tatertotsandjello
betweennapsontheporch
thededicatedhouse thepinjunkie justusfour
what-about findingfabulous tidymom prototypemama
21 random aconqueredmess thegunnysack
knick of time boogieboardcottage
Not just a housewife Inspiration Exchange party cuisine kathleen, stonegableblog
Seasoned homaker Ivy and elephants  CommonGround
Uncommon sliceofsuburbia Coastal Charm

13 Comments

Stay connected to the Kottage

don't miss a thing
☞  SIGN UP TO receive THE LATEST news and updates from Karins Kottage ☜
You’ve successfully signed up! Check your email for details.
Previous Post: « Cupcake Dessert Table for 200! Scalloped Tablecloth and Hot Air Balloon Decorations
Next Post: Master bedroom reveal – Garage sale and thrift store furniture »

Reader Interactions

Comments

  1. Mama Miah says

    July 12, 2016 at 7:46 pm

    Cool, love this art! I'd like to try this on my free time… 🙂

    Reply
  2. Anonymous says

    April 18, 2016 at 3:45 am

    Very Cute!

    Reply
  3. Anonymous says

    January 6, 2016 at 7:08 pm

    the best way to cut the shape of scrapbook paper is to mesure the circle on top and the circle in the middle and divide them by 4. Use those measures to make a template with curved lines on the sides. nice project!

    Reply
    • Anonymous says

      October 7, 2016 at 4:37 pm

      Can you explain a little bit more. I am a beginner but would love to make this.

      Reply
  4. Nancy Keslin says

    April 6, 2014 at 5:51 pm

    This is so adorable. love the colors.

    Reply
  5. Christine Vandormolen says

    April 4, 2014 at 4:33 pm

    soooooooooooooo cool! Pinning

    Reply
  6. Michelle says

    April 4, 2014 at 3:36 am

    Look at them all in the air like that, I thought one looked awesome but all together they look fantastic! Great job 🙂

    Reply
  7. Anonymous says

    April 2, 2014 at 9:43 am

    These are so dang cute! Awesome idea!

    Reply
  8. Laurie Ritchey says

    April 2, 2014 at 3:07 am

    What a great idea! I love these. laurie

    Reply
  9. Madonna/aka/Ms Lemon of Make Mine Lemon says

    April 2, 2014 at 1:15 am

    Thank so much for hosting.

    Reply
  10. thepaintedapron.com says

    April 2, 2014 at 12:39 am

    how awesome are these! Wow! The whole conference looked amazing! What could be better than hot air balloons and cupcakes!
    Jenna

    Reply

Trackbacks

  1. Hot Air Balloon Baby Boy Shower - Karins Kottage says:
    December 27, 2021 at 2:36 pm

    […] you want to see another hot air balloon tutorial you can look at this other one I did a few years […]

    Reply
  2. Cupcake Dessert Table for 200! Scalloped Tablecloth and Hot Air Balloon Decorations - Karins Kottage says:
    April 28, 2021 at 1:23 pm

    […] The tutorial for the Hot air balloons is here. […]

    Reply

Leave a Reply Cancel reply

Your email address will not be published. Required fields are marked *

Recipe Rating


This site uses Akismet to reduce spam. Learn how your comment data is processed.

Primary Sidebar

Search This Blog

Welcome to Karin’s Kottage!

Summer porch

Hi I am Karin! Welcome to my Kottage. I share all things about life here at the Kottage. Cooking, DIY, Crafts and Travel! Learn more about me and my Kottage by clicking on the photo.

Shop My House

Shop My House
  • Contact Us
  • Decorating
  • Entertaining
  • Fashion
  • Recipes
  • Travel

Footer

Looking For Something

Let’s Get Social

  • Email
  • Facebook
  • Instagram
  • Pinterest
  • RSS
  • Twitter
  • YouTube

RSS RSS feed

  • Easy Roasted Vegetable Sandwiches on Ciabatta – A Crowd-Pleasing Favorite!
  • Patriotic Red White Blue Decor + Stylish IKEA Hack
  • Easy & Charming Red, White & Blue Tablescape
  • Fresh Spring Salad Recipes & Farmers Market Inspiration – Weekly Linky Party

Copyright © 2025 · Market theme by Restored 316