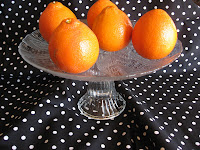
 As I was looking at creative people’s blogs the other day I happened to come across a fun one that showed how to make your own cake plate:(http://armellejewelry.blogspot.com/2007/03/make-your-own-cake-stand.html) I thought it looked so easy so I tried it and here it is!! This is the easiest project I have ever done! It took about 1 minute. All you do is go and find a clear glass plate or really any kind of plate you want and a dessert cup or vase that kind of goes with the plate. I found mine at the thrift store for a total of 2 bucks! I then went to Home Depot and found CLEAR caulking (in the paint section). All you do is squeeze some caulk onto the bottom of the dessert cup and adhere that to the underside of the plate (wipe any excess caulk off with a damp paper towel) and let it sit for about 24 hours
 . Mine seems to be holding just fine and it is beautiful!! Can’t wait to put some gorgeous Easter eggs on it! By the way, this would make a beautiful handcrafted wedding gift!!
Everyday Style and Living for Women Over 50
ah, now that I’ve dug around in your blog, I see you mention what adhesive you use. Thank you!
thanks! i’m glad you like my blog!!
Tiff! This looks amazing!! I love this trick I can’t wait to do it!