It is “Tablescape Thursday” over at Between Naps on the porch and I am showing a napkin fold plus pictures and a video of my table at the bottom.
For the napkin…I call it the “Flower” fold but I don’t really know the real name of the napkin fold. It is so easy to do!  I took pictures step by step so you can see how to do it….. to use on your own table for Valentines day or any time to make your table special.
 I took pictures step by step so you can see how to do it….. to use on your own table for Valentines day or any time to make your table special.
1. Lay a square napkin down on your surface. Mine is approx. 18″ square.
2. Fold all 4 corners into the center
It is a more compact looking package.
4. Flip the whole package over..being careful not to let it unfold
5. Yep you guessed it….Fold all four corners to the center again! It is starting to look like a flower now! You can leave it like this and place something in the center but if you want it to really say WOW!…keep going……
6. Underneath each corner….. there is a flap….just pull it out. You can see my fingers holding on to the underneath flap in the picture below.
Voila! You just made your first Flower napkin!

2. Fold all 4 corners into the center

It looks like a package see below

3. Fold all 4 corners into the center again.

It is a more compact looking package.

4. Flip the whole package over..being careful not to let it unfold

All folds are underneath….smooth side is up

5. Yep you guessed it….Fold all four corners to the center again!
 It is starting to look like a flower now! You can leave it like this and place something in the center but if you want it to really say WOW!…keep going……
 6. Underneath each corner….. there is a flap….just pull it out. You can see my fingers holding on to the underneath flap in the picture below.
 Voila! You just made your first Flower napkin!
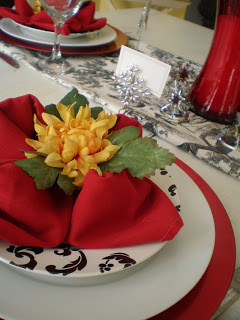
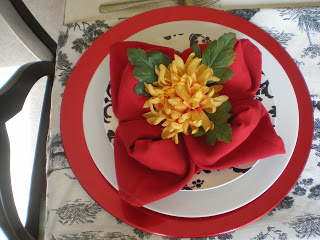
Now add a little pizazz by placing a flower, or candy or some little trinket in the center and you have the WOW factor going on!
Here is my little flower on my black and white salad plate, sitting on my white dinner plate on top of my red charger plate.
 Here is my little flower on my black and white salad plate, sitting on my white dinner plate on top of my red charger plate.
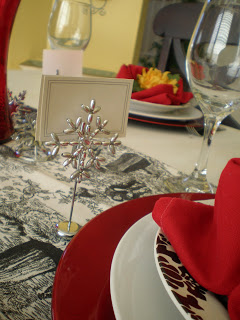
 Here is another shot of the table all decked out with little silver snowflake name card holders.
 The fabric in the center of the table is a piece of black and white Toile from Walmart!
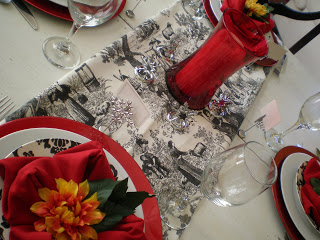 Using what I had on hand to make an ordinary table …extrodinary! he he he
 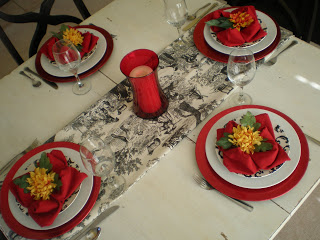 Here is a little video piece on this table decor
with a few added extras….Notice the cake plate (A Christmas cake plate no less) and close ups of the snowflake name card holders. Use what you have and be creative!
Click to play
I love making different napkin folds! I have a lot of them on my Pinterest. Thanks for the tutorial. XO Cindy
Such clever work and I really enjoyed your table napkin tutorial. Its always nice when you can not only be informed, but also entertained! Im sure you had fun writing this post! Keep it up!
what a useful tutorial. thanks for sharing.
Thanks for posting this! I'm trying new napkin folds every day, and it's always nice to see one being done in person!
Thanks so much for sharing the napkin folding…you made it look so easy with the step by step instructions! Love your tablescape…just beautiful! Thanks for a wonderful TT posting! Susan
Beautiful tablescape, love the colors and I use that fold on my washcloths in my guest bathrooms and put little fancy soaps in the middle.
Your table looks great.
That is the same napkin fold I used this week! It’s so easy to do and so impressive when it’s done.
Very nice tutorial. Everyting looks so lovely!
Elaine
I am going to try the flower napkins they look so pretty, your table is beautiful, Kathy
Just love the napkin folding!
Thanks for the napkin tutorial. I’ll be giving one next week on how to do a heart fold.
That is impresive! May try this for our Valentine’s Day Dinner!
Thank you Thank you, I am having a luncheon for several friends next Thursday and this will look so pretty on the table! Sue
I have always loved black and white together but with the added red knapkins, it is stunning. Deb
I thoroughly enjoyed this post and the video as well. I hope that I can remember how you demoed to fold the napkin. If not, I’ll need to read it and follow the picture directions several more times.
Your table looks wonderful. I particularly like the name card holders. The colors are beautifully coordinated. Love the runner.
I used to use this very napkin fold to do presentations a number of years back, it’s one of my favorite! It’s also nice to sit a votive candle in the middle. The flower in the center really is precious! The colors of your Tablescape are gorgeous! Very nice! 😉 ~CC Catherine of “Catherine de th`e Cups”
Love it all! Thanks for showing us how to fold a flower napkin.
I also love how you used fabric & just folded it to make a table runner. I am going to have to remember that as I have sooooooo much fabric & hardly any table runners.
In fact, I have some fabric I should have used for today's tablescape post. Oh well. Maybe next week.
I love your red, white and black! It all looks great! Love the napkin tutorial too. Great ideas and beautiful table.
debbie
Cool….you made that flower napkin look pretty easy. I’m gonna go home and try that! Love you black toile and b/w plates!
What a lovely table!! Thank you for the directions on making the flower napkins!
FUN instructional post! Looks great!
ENJOY your day!
Fifi
Thanks for the creative idea with the napkins. It adds so much to your tablescape.
I loved the tutorial and had wondered how you did it. So pretty!